
How to distress furniture using candle wax and chalk paint, with a little decoupage and stenciling thrown in for fun! (Or, as my dad says..."how to ruin a perfectly good table"....he just doesn't get the whole distressed look)

 So here is the before photo. I picked this little table up at the local co-op. To be honest I probably overpaid a little bit but I was itching to buy something to work on that day and this little table caught my eye. It was just begging to be painted, well, in my opinion it was! It had good bones but was just boring, a bit banged up, and just blended into its surroundings. Well I just cant stand a wallflower, so I scooped it up and brought it home. Ok, confession time, I'm a coward. I scooped her up and brought her to my dad's house. I didn't want to be subjected to "the look" from my husband when I brought home yet another "rescued" piece of furniture and put it in his garage, so I took my dirty little secret to my dad's house so I could work on it when I was over visiting. Good plan if I don't say so myself!
First thing you want to do with any piece before you paint it is wipe
it down, I use mineral spirits, and check all the joints and screws to make sure everything is solid. No repairs needed on this one, so I moved on to the fun stuff.
 To me, this table wanted to be distressed, and it wanted it bad! So I decided to use candle wax. This helps the paint to chip off more easily in the areas you plan on distressing. I used a tea light candle and rubbed it along all the areas where I wanted the original finish to show through when I ultimately attacked it with a scraper after it was painted. I've used Vaseline to do this in the past as well, but I like the wax a little better.
 Now time for the paint!!! Tip: Always flip your furniture and start with the underneath first. Trust me, it makes life easier down the road. I started with a coat of Annie Sloan Chalk Paint in Versailles ( a pretty, soft, earthy green). I did not paint all the way to my edges and left the areas where I wanted a lot of the original finish to show untouched. I then added a coat of Annie Sloan Chalk Paint in Ochre (a warm cream). I did two colors because when I scraped later, I wanted it to look like several layers of old paint had been added over the years.
 After covering the whole piece with paint, I let it dry for a day. Normally when I'm distressing using sandpaper I will only wait a couple of hours and lightly hit all my edges, but because I wanted this piece to be a bit more dramatic than that, I let it dry a whole day so when I hit it with a scraper it would give a more chipped, kept in the barn, farmhouse look. That's not a technical term so don't google it! :)
 Scrape in one direction, you want the "wear" to look natural. Take your time and make sure you just remove paint and don't damage the wood. The idea is to distress not destroy. This is a vintage piece of furniture after all, respect it. The areas where you applied wax will come off more easily since the wax inhibits the paint from getting a good grip. Once you get the hang of it, it's fun and you may get carried away and your piece will end up looking somewhat diseased instead of distressed. (I've learned this the hard way as well!). No worries, that's the beauty of chalk paint, you can just cover it back up and do it again if you went too far.
 Now it's time for the magic......Annie Sloan Wax! I absolutely LOVE this stuff! It finishes the piece, leaving it smooth and protected. Tip: Even if you are going to use dark wax, do a coat of clear wax FIRST. This helps the dark wax go on more evenly and makes it easier to control. Dip just the tip of your brush in the wax, a little goes a long way, the rub gently in a circular motion, doing a section at a time until your piece is covered. (For large pieces, do a section and buff before moving on to the next section). This piece was tiny, so I waxed the entire piece before buffing.
Once you have applied the wax, it's time to buff. Use a lint free cloth and rub until the surface feels smooth. You can move right on to the dark wax if you want the piece to have an aged, antique look, but I actually recommend letting your clear wax dry for at least a few hours first, it gives you a little more control over the dark wax and leaves a little more working time.
 Apply the dark wax the same as you did the clear wax. Go light, a little goes a very long way and you can always add more if you want. Tip: If you over do it on the dark wax, go back over it with some clear wax while the dark wax is still curing and it will lift it. If this still doesn't lighten it up enough for your liking, some mineral spirits will do the trick! Once you are happy with your results, buff buff buff! Wait 24 hours and buff again. It will actually take about 30 days for the wax to fully cure and be hard as a rock. If you find it is still tacky and not curing, you probably over did it. (Again, learned this the hard way). Some mineral spirits on a rag will erase your mistake.
 I did a ton of scraping on the drawer front because I wanted that to be the focus of this piece. Because the piece is small, I only did some distressing on the edges of the legs and sides. To me, it was still missing something.
I love adding graphics to my pieces, but this already had a lot going on with all the distressing so I didn't want to add anything to the top and didn't want to add anything that made it too busy, so I decided to add a stencil to the bottom shelf using Annie Sloan Chalk Paint Versailles (the pretty green color). I wanted it to be subtle. I also painted the drawer sides, inside and out, in Versailles.
 I wanted there to be a little surprise when you open the drawer, so I decoupaged a vintage advertisement from a women's magazine I found at a flea market. I painted the decoupage medium on the bottom of the drawer, cut the ad to size then used a roller to flatten it out. I let it dry then added 3 more layers of decoupage medium on top so that its sealed.
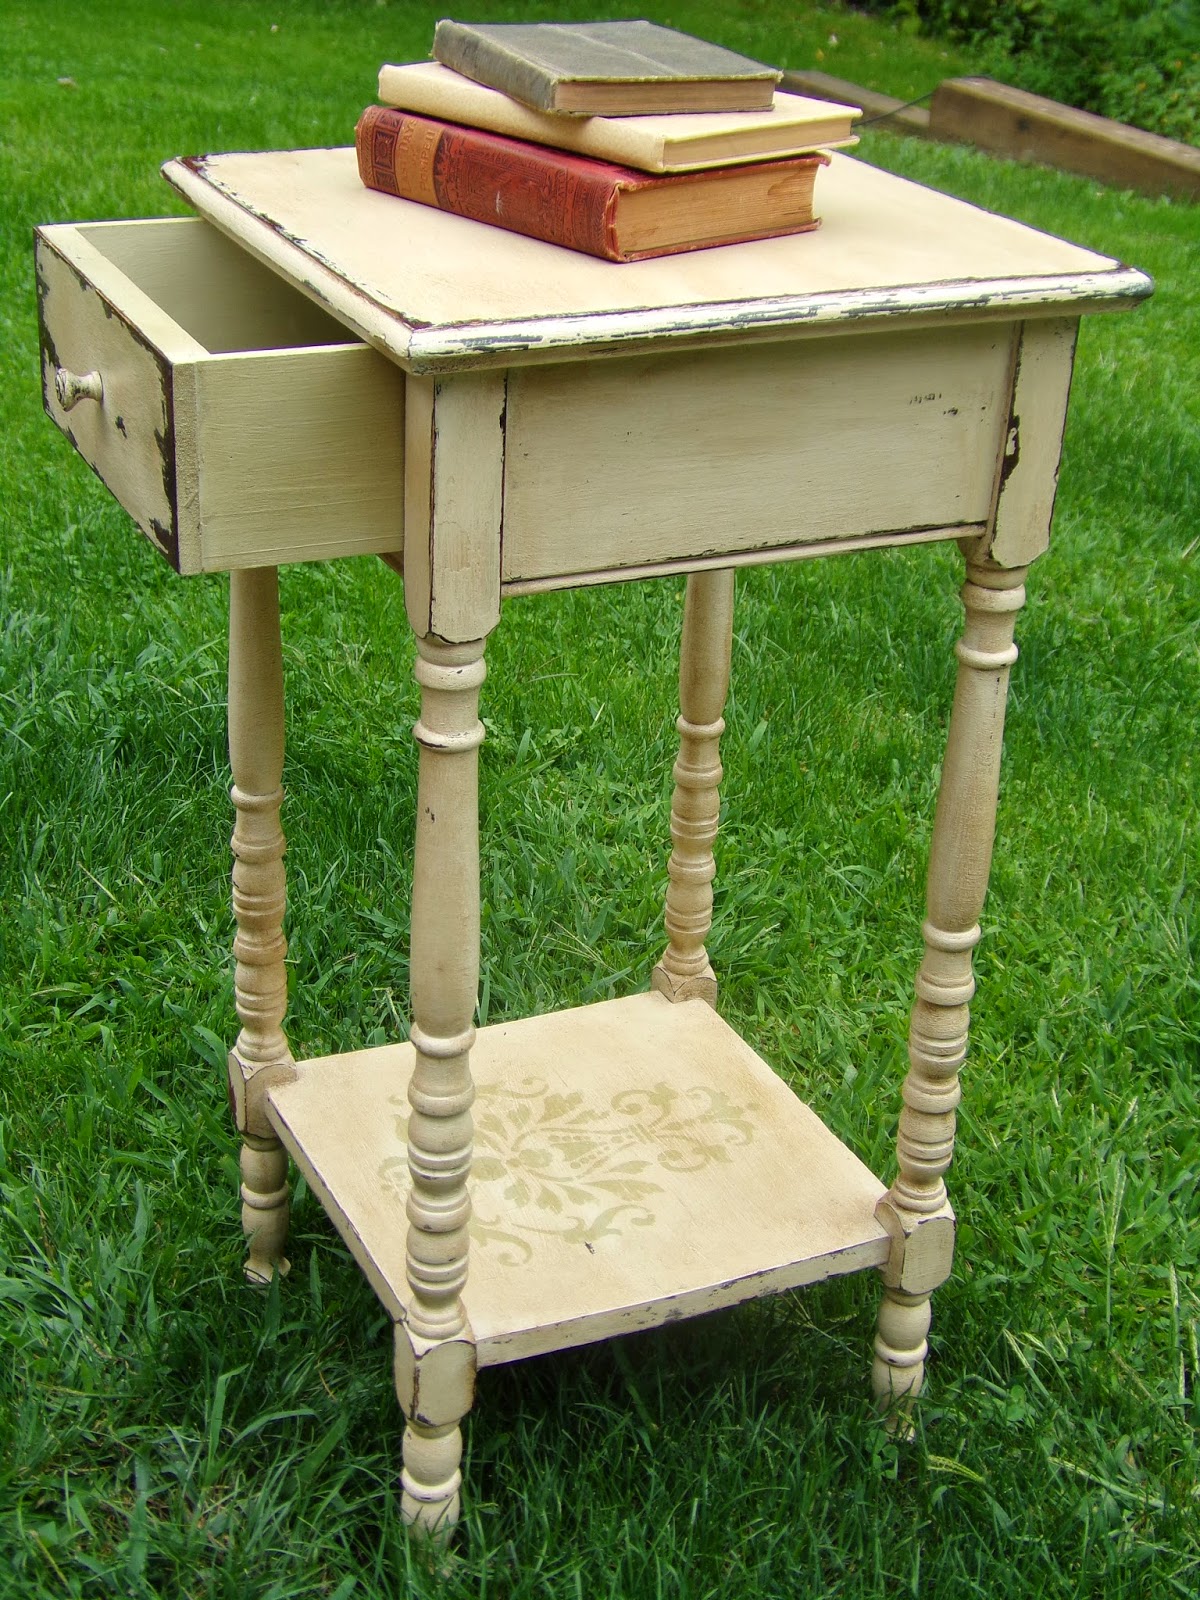
Here's the finished piece!
A funny little side note.......When I finished this table, I proudly present it to my dad, he takes one look at it and say's "It looks like it needs to be thrown away or re-painted." I'm going to take this to mean it was a job well done! LOL
This table is for sale on my etsy store. http://etsy.com/shop/AddictionDecor
No comments:
Post a Comment